Happy almost Fall, friends! I can’t believe how quickly time flies. As much as I love summer, once I embrace that Fall is closer, I do get excited for cozy weekends, crisp sunny days, soccer season, football season, and getting outside even more since it’s not as hot.
With my soccer season starting up, I started to get back into some track workouts and running workouts for the season.
For those that know me, they know I’m not much of a “long distance girlie”. I’m more of a sprint and mid-distance girlie while still using the word distance lightly.
After some treadmill and track runs, I quickly found that I was going to need some actual women’s running shoes if I wanted to train efficiently and honestly with comfort and support.
I did some research and ended up going with the Ultraboost 5X Shoes by adidas and thought I’d give you a review as “what shoes should I buy?” is a one of the top questions I get asked most as a Trainer. Since I’ve been wearing these for a few months now, hopefully my review can help!
First let’s just talk about the COLOR as I happen to be matchy-matchy with my nails too!
I usually go for a neutral shoe all day every day but when I saw this color combo and wanted my “running shoes” to feel special that I wore for a specific goal, I couldn’t pass these up.
The toe of the shoe is spacious enough for all of my toes and doesn’t cause any friction. I like to train 400’s and 200’s on the track, so I strike with the ball of my foot often, and these provide awesome support and bounce for my foot in my sprints.
The heel of the shoe allows for comfortable ankle support and motion whenever I hit any longer distances.
I was worried at first that I wouldn’t love the higher flap behind the ankle but it truly didn’t rub on my skin or hit weirdly in any way.
The PRIMEKNIT upper tongue of the shoe lays smooth on the top of my foot and doesn’t bother me in any way.
The saddle of the shoe, which is the reinforced area around the instep, provides me with good support without being too tight.
I also went with my true to size 8.5 and feel that they are very true to size!
I recently was at a foot specialist for tendinitis of my left foot and often if any shoe is too narrow or tight, my tendonitis will flare causing pain. These shoes do not flare up my tendonitis which is such a plus for me!
When it comes to the weight of the shoe, this shoe shocked me on how light it is! I even had a client who wanted to try them on and she loved how light they were.
I don’t think you can go wrong with an Ultraboost of any kind from adidas but if you’re looking to hit some sprints or distance, I do think this is a great shoe choice that will last you and support your training!
Next post we’ll be chatting all things “cozy” with my cozy collection top outfit picks so stay tuned on the blog! Did someone say oversized womens hoodies and crewnecks??
Here’s 6 Times IFBB Pro League Bikini Champion Breena Martinez’s Workout Routine
Opposite to the belief that women get manly physiques by lifting weights, as an IFBB Pro, Breena believes that women shouldn’t be afraid to lift weights and they won’t get bulky or lose femineity by resistance training. Similarly, Breena Martinez’s workout routine is like an answer that what she says is true.
Breena enjoys sharing her fitness journey, but mainly due to proving that it’s a myth that women who lift heavy get bulky or look like bodybuilders.
When it comes to workouts, Breena ensures every muscle group is trained every week. Similarly, in every training session, she likes exercising to warm up and then train her muscles. She chooses movements that hit all her body parts of the muscles evenly. For instance, for shoulders, she’ll go for anterior, medial, and then rear deltoid.
Breena Martinez’s Workout Routine
Breena Martinez’s workout routine is intense and with attention to detail. She likes hitting specific muscle groups in each session to make sure her workout is balanced and doesn’t make her overtrain. For example, her training split is focused on the lower body, and upper body equally with cardio and full rest day.
Here below is one such workout of Breena, which will give you an overall idea about her training philosophy.
Day 1 – Quads, Glutes & Abs
Exercise Name
Sets
Reps
Leg Extensions
3
15
Bulgarian Split Squats
3
15
BB Front Squats
3
15
Pistol Squats W/ TRX
3
15
Glute Bridges Using Band
4
20
Banded Kickbacks (45 Degree)
4
20
High Ups Rotations
4
20
Leg Ups
4
20
Cardio
–
25 Min
Day 2 – Chest, Back & Abs
Exercise Name
Sets
Reps
BB Bench Press
3
12
Pec Deck
3
12
1 Arm DB Rowing
3
12
Lat Pulldowns
3
12
Seated Rowing (Undergrip)
3
12
Seated Wide Grip Rowing
3
12
Bicycle Crunches
4
20
V – Ups
4
20
Cardio
–
25 Min
Day 3 – Cardio (HIIT)
Exercise Name
Sets
Reps
Jogging on Treadmill (4.5 – 6.5 Speed)
–
2 Min
Inline Push Ups W/ Monster Bands
–
1 Min
Inline Running
–
1 Min
Sprinting
–
15 Seconds
Power Walk (3.5 – 4.5 Speed)
–
45 Seconds
–
–
–
Repeat in intervals for 25 Min
–
–
Day 4 – Hamstrings, Glutes & Abs
Exercise Name
Sets
Reps
Leg Curls
3
12
Leg Press (Single Leg)
3
12
Hamstring Curls (Nordic Style)
3
12
Romanian Deadlifts
3
12
Sumo Deadlifts
3
12
Glute Ham Development W/ Squeeze
3
12
Banded Glute Kickbacks
3
12
3 – Way Leg Drops
4
20
Cardio
–
25 Min
Day 5 – Glutes & Calves
Exercise Name
Sets
Reps
Sumo Squats W/ Smith Machine
3
6 – 8
Reverse Hack Squats
3
6 – 8
Sumo Leg Press
3
6 – 8
Glute Kickbacks
3
6 – 8
Glute Lateral Kickbacks
3
6 – 8
Glute Bridge W/ Bands
3
6 – 8
Calf Raises
4
12
Calf Press Machine
4
12
Cardio
–
25 Min
Day 6 – Shoulders, Arms & Abs
Exercise Name
Sets
Reps
DB Shoulder Press
3
12
DB Side Lateral Raises
3
12
DB Front Lateral Raises
3
12
DB Rear Deltoid Flys
3
12
DB Hammer Curls
3
12
DB Skull Crushers
3
12
3 Way Knee Ins W/ TRX
4
15
TRX Planks
4
30
Cardio
–
25 Min
Day 7 – Rest Day
About Breena Martinez
Breena got into the fitness industry through UFC Gym by being a Personal Trainer in Concord, CA. Being a college athlete and sports advocate for health & sports, it was a career that matched her passion. In a short time of three years, she became one of the successful Personal Trainer within the company that made more than $100k in yearly revenue.
She combined her love for fitness and competition and got her way around to compete in Bikini Bodybuilding. Further, in 2014, she got her IFBB Pro Card, and since then, she has competed for 6 consecutive years in Mr. Olympia (2015 – 2020) and was even invited to compete in the Arnold Classic (2018 – 2019).
Similarly, she managed to follow her personal goal within the sport and started guiding other women to make it to the stage for the first time. In addition, she helps other female athletes by training to get their IFBB Pro Card status. Nonetheless, presently, she is a trainer at the Pro Physique in Gilbert, Arizona and takes online clients.
Wrapping Up
Breena’s journey has seen struggles like any other IFBB Pro athlete and becoming a 6-time IFBB Pro Leaguer Bikini champion wasn’t easier for her either. However, she always stayed dedicated and kept a strategic approach to fitness and competition that helped her shape her career within the fitness industry.
Breena Martinez’s workout routine is rooted in balance precision and offers valuable lessons to anyone who wants to elevate their fitness level. Also, by adopting her principles and tailoring them to your goals, you can stay assured you’ll get results.
Looking to get in shape then follow this Intermediate gym workout for men to get in shape workout plan to gain muscles and lose fat. Remember you must have good fitness level before follow this workout plan. This workout can help you to get in shape fast but only if you follow your given diet strictly and remember always go easy on workout for first few days you must learn about every exercise proper techniques then start pushing your muscles and body what extend possible for you.
It is also advisable to start with light-weight a few 2-3 sets of your first exercise and consider it as your part of the warm-up. if doing bodyweight workout then your body must be proper warm-up before workout. Instead of body-weights exercise you also can choose a treadmill or cross-trainer as your warm-up for 10-15 minutes before workout.
Rest For Recovery
You should follow this workout plan for 8 weeks to 12 weeks.
Join with Us online today for your body transformation, Select your membership plan Sign-Up Today and Stay Connected with Us on Instagram and YouTube for Daily Updates, Offers and Discounts.
Disclaimer:
We serve as coaches, mentors, and guides who help you reach your health, fitness, and wellness goals. Each individual’s health, fitness, and nutrition success depends on his or her background, dedication, desire, and motivation. The information we provide is based on our personal experience as an online fitness trainer & nutritionist. So You must consult with your physician before following any training or diet plans on this website. Because all individuals are different so as their medical and training history & the same way they need personalized diet and training plan according to their specific needs.
Glute bridges are a staple in fitness routines, but when you add a barbell to the mix, the benefits amplify dramatically. Barbell glute bridges are a powerhouse exercise for building strength, improving athletic performance, and sculpting the lower body. In this comprehensive guide, we delve into everything you need to know about barbell glute bridges: their benefits, how to perform them, variations, and tips for optimal results.
What Are Barbell Glute Bridges?
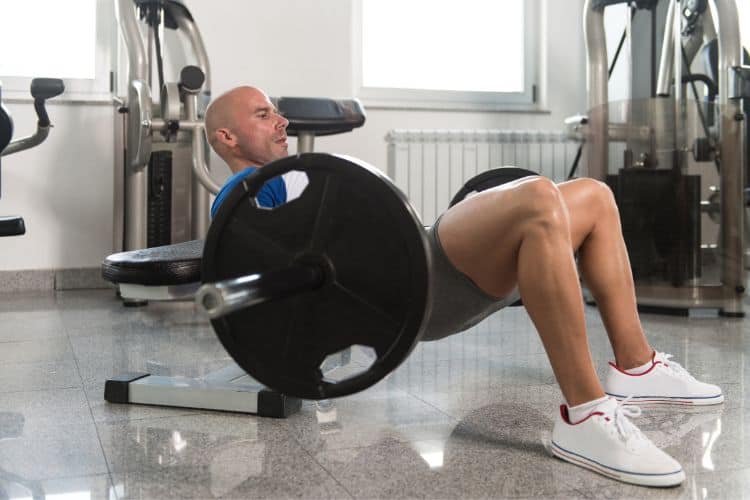
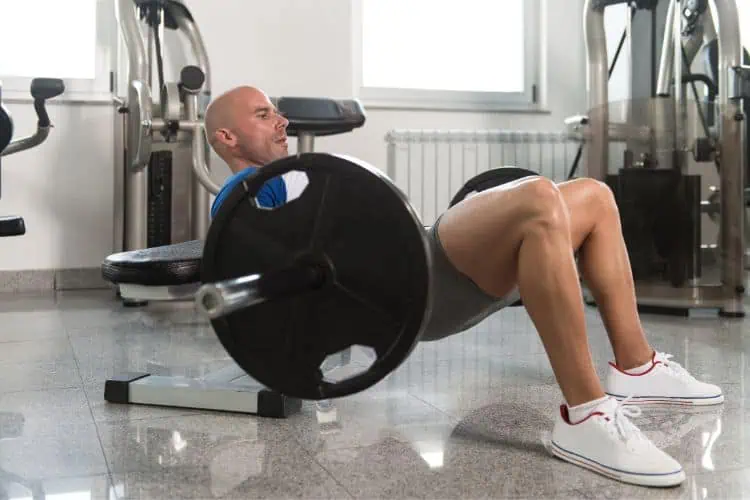
Barbell glute bridges are a lower-body exercise that targets the gluteal muscles while engaging the hamstrings, lower back, and core. This movement involves lying on your back with your shoulders on the ground and your knees bent, placing a barbell across your hips, and thrusting your hips upward. The barbell adds resistance, making the exercise more challenging and effective for muscle growth and strength development.
Benefits of Barbell Glute Bridges
1. Enhanced Glute Strength
The primary benefit of barbell glute bridges is their ability to isolate and strengthen the glutes. Strong glutes contribute to better athletic performance, improved posture, and reduced risk of lower back pain.
2. Improved Hip Thrust Power
Barbell glute bridges train the hip thrust motion, which is critical in activities like sprinting, jumping, and lifting. This exercise enhances your explosive power, translating to better performance in sports and functional activities.
3. Versatility for All Fitness Levels
Whether you’re a beginner or an advanced lifter, barbell glute bridges can be adapted to suit your fitness level. Adjusting the weight and range of motion allows for scalable progress.
4. Reduced Risk of Injury
Strengthening the glutes helps stabilize the pelvis and support the lower back, reducing the likelihood of injuries during other exercises or daily movements.
How to Perform Barbell Glute Bridges Correctly
Step-by-Step Guide
Setup: Start by sitting on the ground with your back against a bench and a loaded barbell in front of you. Roll the barbell over your legs until it rests above your hips. Use a barbell pad or a towel for comfort.
Positioning: Place your feet flat on the ground, hip-width apart, with your knees bent at a 90-degree angle. Your upper back should rest on the edge of the bench.
Engage Your Core: Tighten your core and glutes before lifting.
Lift: Drive through your heels to lift your hips toward the ceiling, ensuring your body forms a straight line from your shoulders to your knees. Avoid overarching your lower back.
Squeeze: At the top of the movement, squeeze your glutes and hold for 1-2 seconds.
Lower: Slowly lower your hips back to the starting position, maintaining control throughout.
Common Mistakes to Avoid
Arching the Lower Back: Keep your core engaged to prevent unnecessary strain on the lower back.
Incorrect Bar Placement: Ensure the bar rests comfortably on your hips, not your stomach.
Lifting with the Back: Focus on using your glutes and hamstrings to drive the motion.
Variations of Barbell Glute Bridges
1. Single-Leg Barbell Glute Bridge
This variation increases the intensity by isolating each leg. Perform the exercise with one leg raised, ensuring even glute development.
2. Elevated Barbell Glute Bridge
Place your feet on an elevated surface to increase the range of motion and challenge your glutes further.
3. Resistance Band Barbell Glute Bridge
Add a resistance band around your thighs to activate the glute medius and improve hip stability.
4. Barbell Hip Thrust
A close cousin to the glute bridge, the hip thrust involves a similar movement but with a bench supporting your upper back, allowing for a deeper range of motion.
Programming Barbell Glute Bridges
For Beginners
Sets and Reps: Start with 3 sets of 10-12 reps using light to moderate weight.
Frequency: Perform the exercise 2-3 times per week.
Intermediate Lifters
Sets and Reps: Progress to 4 sets of 8-10 reps with heavier weight.
Frequency: Include barbell glute bridges in your routine 3-4 times weekly.
Advanced Lifters
Sets and Reps: Perform 5 sets of 6-8 reps with challenging weight.
Frequency: Add variations like single-leg or elevated bridges for diversity and increased difficulty.
Complementary Exercises for Glute Development
1. Squats
Squats are a compound movement that engages the glutes, quads, and hamstrings. Combine them with barbell glute bridges for a comprehensive lower-body workout.
2. Deadlifts
Deadlifts target the posterior chain, including the glutes, hamstrings, and lower back, complementing the activation provided by glute bridges.
3. Lunges
Lunges add dynamic movement to your routine, enhancing glute strength and improving balance and coordination.
4. Step-Ups
This unilateral exercise focuses on one leg at a time, ensuring balanced glute development.
Tips for Maximizing Results
1. Prioritize Form Over Weight
While it’s tempting to load the bar with heavy weights, proper form should always come first to avoid injuries and maximize muscle activation.
2. Warm Up Effectively
Incorporate dynamic stretches and activation exercises like bodyweight glute bridges to prepare your muscles for the workout.
3. Increase Intensity Gradually
Progressive overload is key to building strength. Gradually increase the weight, sets, or reps over time.
4. Incorporate Recovery
Allow adequate rest between sessions to let your muscles recover and grow. Use techniques like foam rolling and stretching to alleviate tightness.
Frequently Asked Questions
Q: Can barbell glute bridges replace squats?
A: While barbell glute bridges are excellent for targeting the glutes, they don’t provide the same full-body activation as squats. Both exercises have unique benefits and should ideally complement each other in a balanced workout program.
Q: Are barbell glute bridges suitable for beginners?
A: Absolutely! Beginners can start with bodyweight glute bridges and gradually add weight as they build strength and confidence.
Q: How heavy should the barbell be?
A: The weight depends on your fitness level and goals. Start with a manageable weight that allows you to maintain proper form throughout the exercise.
Q: Can barbell glute bridges help with lower back pain?
A: Strengthening the glutes through exercises like BGB can alleviate lower back pain by improving pelvic stability and reducing strain on the lumbar spine.
Final Thoughts
Barbell glute bridges are a versatile and highly effective exercise for building strong, sculpted glutes. Whether you’re a beginner or an experienced lifter, incorporating this movement into your workout routine can enhance your strength, athletic performance, and aesthetics. By mastering the technique, experimenting with variations, and following a structured program, you can unlock the full potential of this powerhouse exercise. Remember to stay consistent, prioritize recovery, and celebrate your progress along the way!
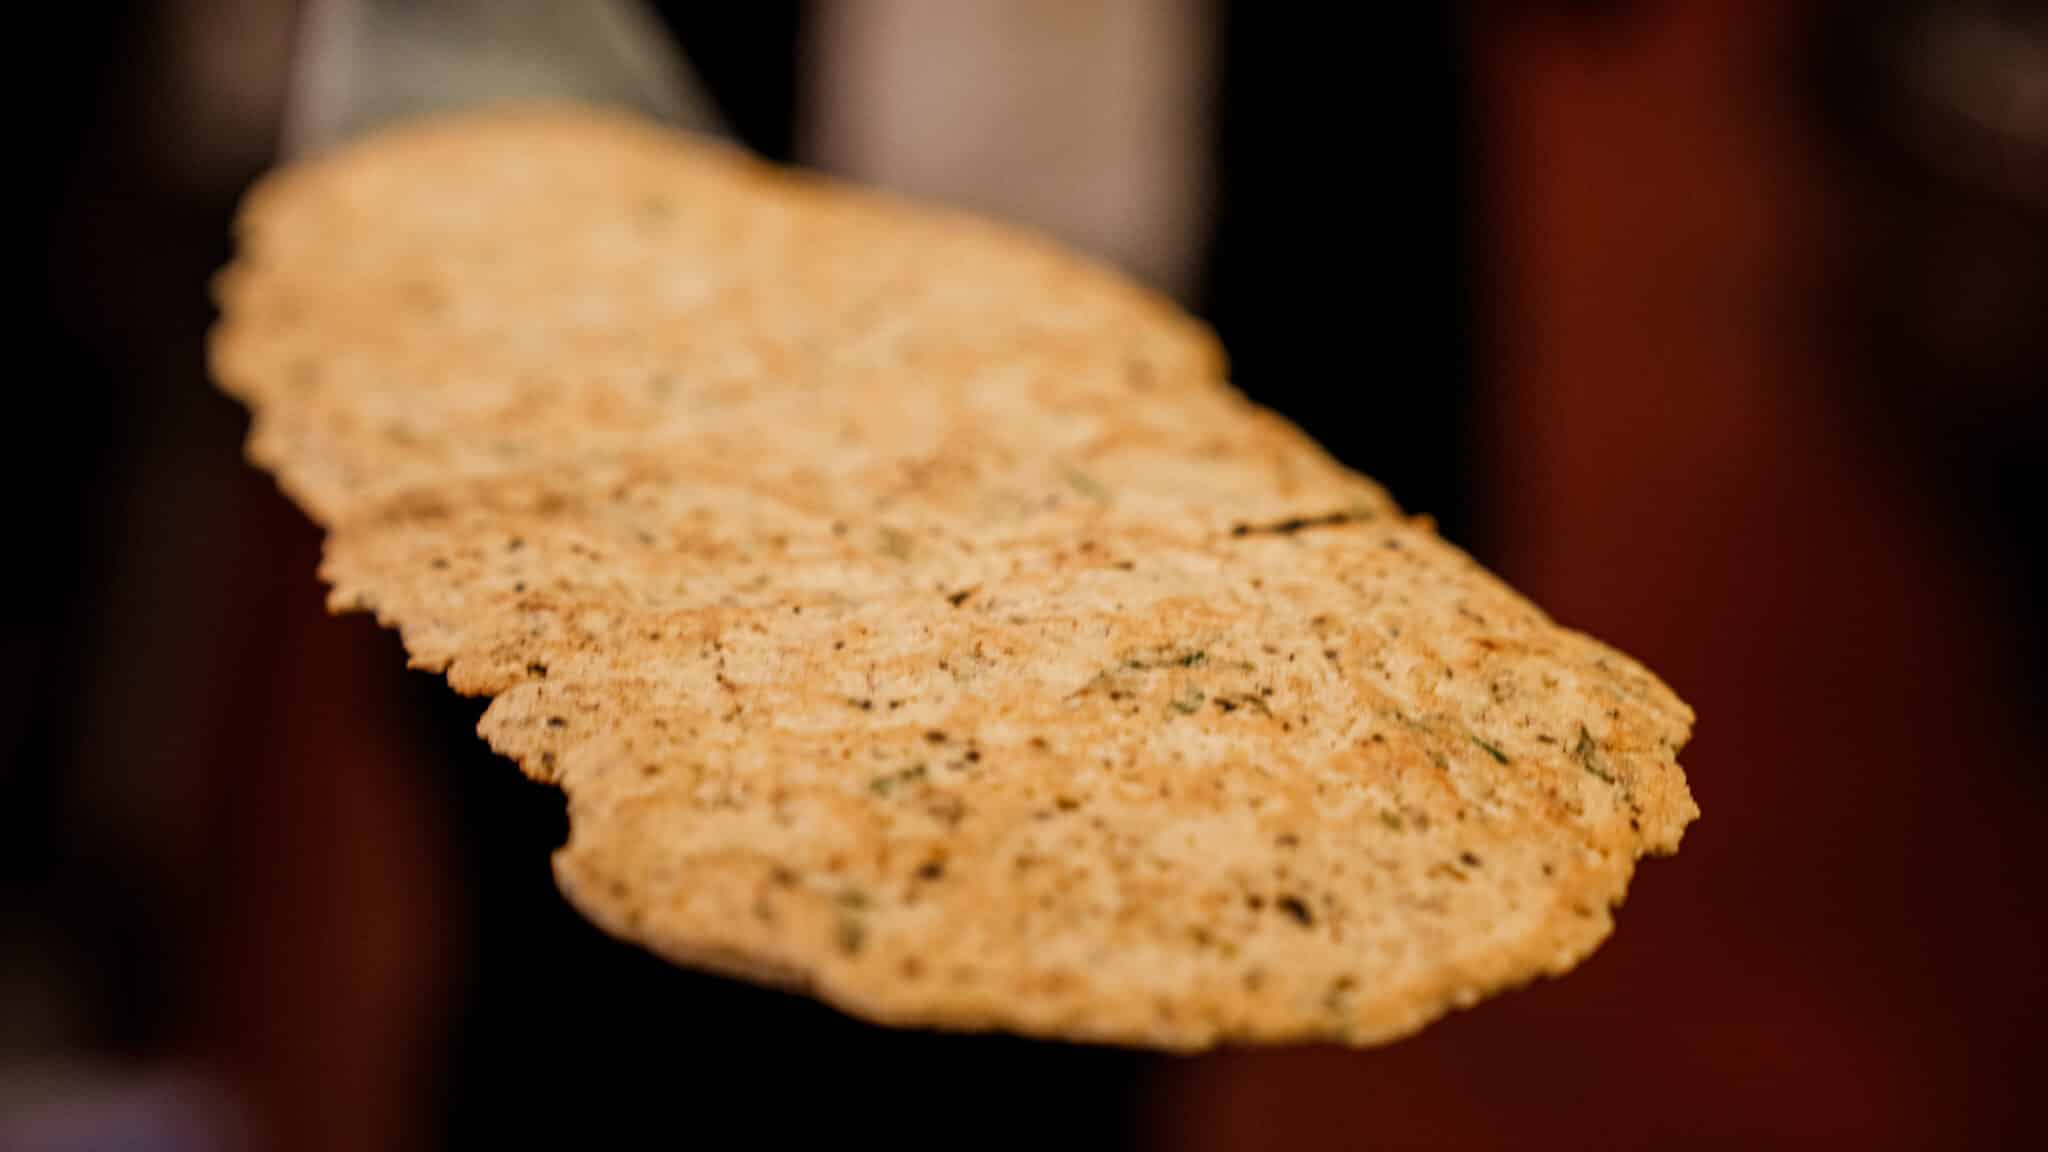
Bazlama, a soft and fluffy flatbread, has been a staple in Turkish cuisine for centuries. Known for its delightful texture and versatility, this traditional bread has captivated food enthusiasts around the world. Join us as we explore the rich history, key ingredients, and versatile uses of Bazlama flatbread, and discover a tantalizing recipe that will make your taste buds dance with joy.
A Glimpse into History
Bazlama’s roots trace back to the Anatolian region of Turkey, where it has been a beloved part of the local diet for generations. Traditionally baked on a hot griddle, this flatbread was often enjoyed fresh and warm, straight from the fire. Its popularity spread throughout the Middle East and Mediterranean, where variations of Bazlama can be found in many cultures. The simplicity of its ingredients and the ease of preparation made it a household favorite, and today, it continues to be a symbol of comfort and tradition.
Key Ingredients for a Modern Twist
While traditional Bazlama recipes typically use wheat flour, our modern version incorporates some unique ingredients to enhance flavor and nutrition. Here’s what you’ll need to make a batch of this irresistible flatbread:
Filtered Water (400g): Ensures a clean and pure base for the dough.
Baking Powder (15g) and Baking Soda (7g): Provide the necessary leavening for a light and fluffy texture.
Coconut Sugar (26g): Adds a subtle sweetness and a hint of caramel flavor.
Almond Yogurt (275g): A dairy-free alternative that adds creaminess and moisture.
Extra Virgin Olive Oil (52g): Enhances the richness and gives a silky texture.
Salt (15g): Balances the flavors.
Garbanzo Flour (1100g): A gluten-free option that offers a nutty taste and a dense, satisfying bite.
Chopped Parsley (25g): Fresh and vibrant, it adds a burst of color and flavor.
Dried Oregano (15g): A classic herb that provides an aromatic touch.
Urfa Fiber (15g): Adds a smoky, slightly spicy note that makes the flatbread unique.
Versatile Use Cases
Bazlama flatbread is incredibly versatile and can be used in numerous ways to elevate your meals:
Traditional Enjoyment: Serve it warm with a pat of butter or a drizzle of olive oil for a simple yet satisfying snack.
Sandwich Wrap: Use Bazlama as a wrap for your favorite fillings, from grilled vegetables and hummus to succulent kebabs and tzatziki.
Pizza Base: Top the flatbread with tomato sauce, cheese, and your favorite toppings, then bake for a quick and delicious pizza.
Side Dish: Pair it with soups, stews, or salads to add a hearty component to your meal.
Breakfast Delight: Spread with almond butter and honey or avocado and eggs for a nutritious start to your day.
Recipe: How to Make Bazlama Flatbread
Now that you’re familiar with the history, ingredients, and uses of Bazlama, let’s dive into the recipe.
Ingredients:
400g Filtered Water
15g Baking Powder
7g Baking Soda
26g Coconut Sugar
275g Almond Yogurt
52g Extra Virgin Olive Oil
15g Salt
1100g Garbanzo Flour
25g Chopped Parsley
15g Dried Oregano
15g Urfa Fiber
Instructions:
In a large mixing bowl, combine the garbanzo flour, baking powder, baking soda, coconut sugar, salt, dried oregano, and urfa fiber. Mix well.
Add the almond yogurt, extra virgin olive oil, and filtered water to the dry ingredients. Mix until a dough forms.
Fold in the chopped parsley, ensuring it is evenly distributed throughout the dough.
Knead the dough on a floured surface for about 5-7 minutes until it is smooth and elastic.
Divide the dough into equal portions and shape them into balls. Flatten each ball into a disc about 1/2 inch thick.
Heat a griddle or non-stick pan over medium heat. Cook each flatbread for about 2-3 minutes on each side until golden brown and puffed up.
Serve warm and enjoy!
The Last Bite…
Bazlama flatbread is more than just bread; it’s a culinary journey that connects us to the rich traditions of Turkish cuisine. With its soft texture, delightful flavor, and endless versatility, Bazlama is sure to become a favorite in your kitchen. Try out our modern twist on this classic recipe, and let the flavors transport you to the heart of Anatolia. Ready to take your healthy home cooking to the next level? Join our Culinary Fit program, where my team and I guide you in mastering techniques like perfecting meat cuts, crafting nutritious sauces, and creating delicious dishes just like this one. Let’s make your kitchen the heart of health!
The Ultimate Guide For Building Bigger Calves Even With Bad Genetics is about helping you build the most awesome calves possible, even if you have bad genetics. I’m dedicated to providing world class guidance and resources to help you achieve legendary results. With over 160 pages inside you will learn everything necessary to achieve epic calves.
Embracing a healthy lifestyle, a balanced diet, supplement recommendations, and a disciplined workout regimen. This ebook is designed to offer the tools to help you breakthrough your calf development setbacks and plateaus. Backed by the Hitch Fit legacy of excellence in fitness coaching, The Ultimate Guide For Building Bigger Calves Even With Bad Genetics brings you specialized expertise and proven strategies.
Sacha inchi oil, derived from the seeds of the sacha inchi plant, has gained popularity for good reason. This oil is packed with nutrients and is an abundant source of essential fatty acids. It offers a variety of benefits, from its antioxidant properties to its anti-inflammatory effects.
This versatile oil can enhance your health, beauty routine, and culinary adventures. Whether you’re seeking to improve your nutrition or elevate your skincare, sacha inchi oil may be just what you need. Curious about what this oil can do for you? Read on to uncover the impressive benefits of sacha inchi oil.
(This post includes affiliate links for which I may earn a commission at no extra cost to you should you make a purchase)
What is sacha inchi oil?
Extracted from the seeds and flesh of a fruit that grows around the Amazonian rain forest, sacha inchi oil is emerging as one of the ‘newest’ superfoods.
Cultivated for centuries in South America, sacha inchi has long been used for its health and medicinal properties. It’s also grown in countries throughout Southeast Asia. Recently, it has been gaining more attention worldwide
The raw seeds that produce sacha inchi oil are inedible. However, they can be lighted roasted for a nutritious snack with a nutty flavor.
They’re also known as the ‘Inca peanut’ or ‘sacha peanut’ because they have a nut-like appearance and taste. The scientific name for sacha inchi is Plukenetia Volubilis Linneo.
If you want to check out some of the best Sacha Inchi products on the market, click on the useful kit below to see what’s on offer.
What is sacha inchi oil good for?
Sacha inchi packs a powerful healthy punch and shows promising benefits for improving the body’s nutritional status. Sacha inchi oil benefits extend to the health of your skin and hair.
Best of all, it comes from a sustainable source and is ethically harvested at sacha inchi plantations. It has a long production cycle, and the sacha inchi plant assists in the reforestation of the Amazon.
Sacha inchi is sometimes spelled incorrectly as Sacha inci, Sachi inchi, Sasha inchi, Sancha inchi oil, Incha oil, or Sacha oil!
Let’s look at some of the little-known sacha inchi oil benefits and why it deserves superfood status. We will also address the limited research available, and any potential side effects.
Sacha inchi oil benefits
The first five sacha inchi oil benefits listed are reflective of the high levels of essential fatty acids (it’s especially rich in omega 3) contained in the seed. Sacha inchi oil contains higher levels of omega 3 than any other plant-based oil.
Sacha inchi oil health benefits – improve cardiovascular health
The ‘good fats’ or ‘healthy fats’ contained in sacha inchi oil can help lower LDL (‘bad’) cholesterol levels. Although further studies are needed, a pilot study suggests benefits for the lipid profile of patients with dyslipidemia.
Sacha inchi oil’s omega 3 fatty acid is not the only thing that helps promote a healthy cardiovascular system. It’s also a good source of phytosterols. Phytosterols have a similar structure to cholesterol so they reduce cholesterol absorption and can, therefore, help support a healthy cardiovascular system.
Sacha inchi oil benefits for skin
Sacha inchi oil benefits extend to skin health. It’s a powerful antioxidant, which helps counter the effects of free radical damage. It also has an excellent fatty acid composition, crucial for good skin health. Fatty acids help maintain the skin’s softness and elasticity and retain moisture.
The benefits of sacha inchi oil for skin are extended by the tocopherols contained in the oil. Tocopherols are part of the vitamin E family. Vitamin E can help the skin maintain elasticity due to its role in collagen production. These sacha inchi oil skin benefits are worth considering as part of a plan for healthy, vibrant skin.
Potential Inca inchi oil skin benefits have led to the availability of a wide array of sacha inchi skin products on the market.
Weleda, one of my favorite natural skincare brands, has a gorgeous night cream with sacha inchi and lavender to help rejuvenate, hydrate, and replenish your skin overnight.
Sacha inchi oil benefits for hair
Sacha inchi oil can be a great addition to a natural hair care regime. The reasons it’s so great for hair are very similar to the benefits for skin. The high omega 3 content can help keep hair conditioned by locking in moisture. This can also help relieve the irritation from a dry, itchy scalp.
There are many sacha inchi oil for hair products available. Try this healing shampoo and conditioner with sacha inchi. They are specifically designed for dry, damaged, and color-treated hair.
Sacha inchi can play a role in defense against diabetes
Sacha inchi oil could play a role in defending against diabetes. This is again due to the high levels of omega 3 contained within the oil. Omega 3’s help regulate blood sugar levels by improving insulin sensitivity.
Because people with diabetes have trouble balancing their levels of insulin and glucose, sacha inchi benefits could extend to helping diabetics manage their condition.
Sacha inchi oil benefits for brain health
The majority of the brain is comprised of fats. This is another reason essential fatty acids are crucial for optimal health. As you know, sacha inchi oil has an excellent fatty acid profile. This helps to decrease inflammation in the brain and have the potential to protect against diseases such as dementia and Alzheimers.
Sacha inchi seeds benefits | Sacha inchi protein benefits
Sacha inchi oil benefits extend to its protein content. Protein is an important macronutrient that helps repair all the tissues in the body. It plays a vital role in workout recovery and also in satiety.
At approximately 25% protein (or 3 grams of protein per 10-gram serving), sacha inchi is a good source of plant-based protein. Notably, it’s also a complete protein, meaning it contains all nine essential amino acids. Only a few plant-based foods can claim this title!
The combination of sacha inchi protein and essential fatty acids makes it a great addition to a vegan diet.
Sacha inchi protein powder benefits
Sacha inchi protein powder benefits will be similar to those in other sacha inchi products, as long as nothing else has been added.
Inca inchi oil benefits: Sacha inchi can help you sleep better and feel happier!
Sacha inchi oil benefits for sleep cannot be dismissed! The oil contains tryptophan, an amino acid that can increase the release of serotonin.
Serotonin is a ‘feel-good’ hormone that can help promote rest, relaxation, and happiness.
Sacha inchi oil also contains a decent level of magnesium, which could further contribute to its ability to aid in a good night’s sleep.
Sacha inchi oil uses: May even help with weight loss!
The potential weight loss benefits of sacha inchi oil are again due to the presence of tryptophan. This time the benefits stem from the fact that tryptophan helps regulate appetite. Additionally, the fiber and protein content can help.
It’s more ‘shelf stable’ than other vegetable oils
The high levels of tocopherols contained in Sacha inchi oil mean it has a high antioxidant capacity. The shelf life of the product can be as long as two years. Keeping sacha inchi oil in the fridge is advised to prolong shelf life.
Sacha inchi oil side effects | Sacha inchi seeds side effects
There are limited human studies on sacha inchi oil side effects. One study with 30 participants compared the acceptability, safety, and efficacy of oral administration of sacha inchi oil. The study compared the effects of sacha inchi oil as compared to sunflower oil. The most commonly reported sacha inchi oil side effect was nausea in the initial weeks.
However, this was also reported in the group consuming sunflower oil. Acceptability improved over time and the study reported sacha inchi oil as safe for consumption.
Overall, it is considered safe to consume, and adverse effects are not common. Sacha inchi has been recognized by the FDA as generally safe to consume (GRAS).
Some people may experience mood-altering effects, which could interfere with the effects of certain medications. If mood swings occur, it’s best to cease the consumption of sacha inchi oil.
How to use sacha inchi oil
Sacha inchi oil is versatile and can be easily incorporated into your daily diet and skincare routine. Below are several ways you can use this nutrient-rich oil to enjoy its numerous health benefits.
Culinary Uses
Sacha inchi oil has a mild, nutty flavor, making it an excellent addition to various dishes. Here are some culinary applications:
Salad Dressings: Use it as a base for homemade salad dressings. Combine it with vinegar, lemon juice, mustard, and herbs for a healthy and delicious dressing.
Drizzling: Pour a little over grilled vegetables, pasta, or rice dishes to enhance flavor and nutrition.
Dips and Marinades: Mix it into your favorite dips, such as hummus or guacamole, or use it in a marinade for meats and tofu before cooking.
Smoothies and Shakes
For a health boost, add a tablespoon of sacha inchi oil to your morning smoothie or protein shake. This addition can enrich your drink with essential fatty acids and enhance its nutritional profile.
Baking and Cooking
Sacha inchi oil has a high smoke point (around 450°F or 232°C), making it suitable for various cooking methods. It’s particularly effective for:
Baking
Incorporate sacha inchi oil into baked goods as a healthier fat alternative to butter or vegetable oil. It works well in recipes for muffins, pancakes, and cakes, providing a unique flavor and added nutrients.
Cooking at Low to Medium Heat
Use sacha inchi oil when sautéing vegetables or for light stir-fried dishes. The mild flavor can enhance the taste of your meals without overpowering other ingredients.
Nutritious Additions to Condiments
You can boost the nutritional value of condiments like mayonnaise, ketchup, and mustard by mixing in a teaspoon of sacha inchi oil. This not only enriches them with healthy omega fatty acids but also adds a subtle, nutty twist to ordinary flavors.
Skin and Hair Care
Beyond culinary uses, sacha inchi oil shines in beauty and personal care. Packed with antioxidants and fatty acids, it can nourish and rejuvenate skin and hair.
To use Sacha Inchi oil on your skin, apply a few drops to your fingertips and gently massage it onto clean, dry skin, focusing on areas that need extra hydration or attention, such as dry patches or fine lines. Use it after bathing or showering to lock in moisture and enhance skin softness.
When applying Sacha Inchi oil to your hair, you can either use it as a leave-in treatment by massaging a small amount onto your scalp and through the lengths of your hair or mix a few drops into your regular conditioner for added nourishment and shine. This oil will help boost moisture levels, promote a healthier scalp, and provide a natural sheen to your strands.
Sacha inchi oil reviews
If you want to hear some sacha inchi oil testimonials and reviews of other sacha inchi oil products, check out the videos below.
The first two sacha inchi product reviews are about the nut form. These are sometimes also called sacha seeds. The third video review is about a sacha inchi oil hair product.
Inchaway sacha inchi oil is a popular brand in Malaysia. However, I didn’t include an inchaway review below since the ones I found were poor quality or weren’t in English.
Where to buy sacha inchi oil and other sacha inchi supplements
Sacha inchi oil prices range depending on the quantity, quality, and manufacturer. It can be purchased from a number of online outlets.
As well as oil, you’ll be able to find food products containing sacha inchi, sacha inchi powder, and packaged forms of the sacha inchi nut. Sacha inchi nuts benefits include the fact that they’re an easy, ready-to-eat snacking option. I purchased some off the shelf when we were in Laos!
Let’s finish up with some of the most frequently asked questions about sacha inchi (Plukenetia Volubilis L.)
What is the best time to take sacha inchi oil?
Sacha inchi oil can be taken at any time that fits your routine, but many find it beneficial to take it with meals to enhance nutrient absorption. Whether you drizzle it over your salad or blend it into a smoothie, incorporating it into your daily diet can help you reap its full rewards.
Is sacha inchi oil better than fish oil?
Sacha inchi oil (Plukenetia Volubilis L.) is often considered a superior choice to fish oil due to its plant-based omega fatty acids, which are easier for some people to digest and don’t have the fishy taste. Plus, it’s packed with antioxidants and doesn’t carry the risk of ocean-borne contaminants—making it a win-win for health-conscious consumers!
Is sacha inchi good for the kidneys?
Sacha inchi (Plukenetia Volubilis L.) may benefit kidney health thanks to its anti-inflammatory properties and rich antioxidant content, which can support overall kidney function. However, if you have existing kidney concerns, it’s wise to seek medical advice before adding any new supplement to your routine.
Is sacha inchi good for your eyes?
Absolutely! Sacha inchi oil is a rich source of omega fatty acids and antioxidants, which can contribute to overall eye health by supporting cellular function and combating oxidative stress. So, adding a splash of this golden oil to your diet could help keep those peepers sharp and healthy!
How much sacha inchi oil should I take?
The recommended daily intake of sacha inchi oil varies, but a common guideline is one to two tablespoons capsules as a dietary supplement for an adult human. This amount allows you to enjoy its benefits without overdoing it, so feel free to incorporate it into your meals as you see fit!
Is sacha inchi good for the liver?
Yes, sacha inchi oil can be quite beneficial for liver health! Its omega fatty acid content and high levels of antioxidants help support liver function and reduce inflammation, making it a valuable addition to a well-balanced diet.
Can I take sacha inchi oil at night?
Absolutely, you can take sacha inchi oil at night! Just like during the day, it’s all about what works for your routine—you can enjoy it as a finishing touch to your evening meal or as part of your pre-bedtime ritual without any issues.
Can I apply sacha inchi oil on my face?
Yes, you can definitely apply sacha inchi your face! Its nourishing properties make it a great natural moisturizer for many skin types, including oily skin, sensitive skin, and acne-prone skin. It helps hydrate and rejuvenate without any greasy residue—just remember to do a patch test first to ensure your skin loves it!
Disclaimer: This article contains affiliate links. This means that if you make a purchase after clicking on one of these recommended service provider links, like an insurance broker, or a travel agent, I may earn a commission – at no extra cost to you. [For my full disclosure, please see my DISCLAIMER page].
As we step into 2025, it’s time to set realistic and achievable goals to start the new year with energy and intention. The holidays may have thrown off your routine, but now is the perfect time to get back on track and make this year your healthiest yet! Here are some practical tips to get back into the groove:
1. Set Up a Realistic Plan
Decide on a workout time that works for you—whether it’s morning, during lunch, or after work. Once you’ve chosen, commit to it by putting it in your schedule or setting a reminder on your phone. Following a set plan each day gives you a sense of accomplishment and keeps you motivated. Take a look at our class schedule ahead of time to see what works for you!
2. Prepare Ahead
Set yourself up for success by organizing everything the night before. Lay out your workout clothes, pack your gym bag, and prep meals or snacks for the day. A little planning can save you time and reduce stress, making it easier to stick to your goals in the morning.
3. Set Your Alarms (and Stick to Them)
Keeping a consistent wake-up time, Monday through Friday, can help regulate your internal clock. Start by setting your alarm to the same time each day, and your body will eventually adjust. In just a few weeks, you may find it easier to get up and start your day with purpose.
4. Prioritize Sleep
Sleep is essential for health, mood, and recovery. Aim for 7-9 hours each night to give your body the rest it needs. Lack of sleep can disrupt hunger cues, leave you feeling drained, and affect your motivation. Make rest a priority so you’re ready to tackle your workouts and daily goals.
5. Focus on Consistency
Routine is the foundation of progress. When you repeat healthy habits daily, your body adapts, and mental and physical changes become more noticeable. By sticking to your goals consistently, you’ll build momentum and create lasting results. Did you know that you can sync your calendar with the Healthworks + Republic Fitness App? Stay consistent by keeping your calendars synced!
6. Refresh Your Gear
New workout clothes or shoes can be a great way to motivate yourself. Treat yourself to something that makes you excited to head to the gym or start your workout at home. A little gear refresh can go a long way toward keeping you on track.
7. Bring Confidence into Every Step
Above all, believe in your ability to reach your goals. Approach each day with a positive mindset, and remember that every small step forward counts. Be patient, be kind to yourself, and celebrate the progress you make along the way.
Make 2025 the year you commit to your health and fitness journey with practical, attainable goals. Here’s to a year of strength, balance, and progress!
If you’ve recently experienced a workout injury, you’re not alone. In fact, it’s common for individuals to experience injuries during exercise, whether it’s a sprained ankle, pulled muscle, or something more severe. While it’s important to seek medical attention if necessary, there are also steps you can take to help your body recover and get back to your fitness routine.
One of the best ways to recover from a workout injury is to rest. This may seem obvious, but many individuals try to push through the pain and continue exercising, which can often make the injury worse. Instead, take a break from your fitness routine and allow your body time to heal. Depending on the severity of the injury, this may mean taking a few days off or several weeks. Listen to your body and don’t rush the healing process.
In addition to rest, there are other ways to promote healing and recovery from a workout injury. These may include stretching, foam rolling, and other forms of self-massage, which can help improve circulation, reduce inflammation, and alleviate muscle tension. It’s also important to stay hydrated and eat a balanced diet to provide your body with the nutrients it needs to heal. By taking these steps, you can help your body recover from a workout injury and get back to your fitness routine as soon as possible.
Understanding Workout Injuries
Working out is an essential part of a healthy lifestyle, but it can sometimes lead to injuries. It is important to understand the different types of workout injuries, their common causes, and the symptoms to recognize to prevent and treat them effectively.
Types of Workout Injuries
There are several types of workout injuries, including:
Muscle strains and sprains: These occur when muscles or tendons are overstretched or torn.
Joint injuries: These include dislocations, sprains, and fractures.
Overuse injuries: These are caused by repetitive movements and include conditions such as tendinitis and stress fractures.
Common Causes
Workout injuries can be caused by a variety of factors, including:
Poor form or technique: Incorrect form or technique can put unnecessary stress on the body and lead to injury.
Overtraining: Overtraining can lead to fatigue and increase the risk of injury.
Lack of rest and recovery: Rest and recovery are essential for allowing the body to repair and prevent injury.
Inadequate warm-up and cool-down: A proper warm-up and cool-down can help prevent injury by increasing blood flow and reducing muscle tension.
Symptoms to Recognize
Recognizing the symptoms of a workout injury is essential for proper treatment. Some common symptoms include:
Pain: Pain is the most common symptom of a workout injury and can range from mild to severe.
Swelling: Swelling can occur at the site of the injury and is often a sign of inflammation.
Limited range of motion: Limited range of motion can be caused by joint injuries or muscle strains and sprains.
Weakness: Weakness can occur in the affected area and is often a sign of muscle damage.
By understanding the different types of workout injuries, their common causes, and the symptoms to recognize, you can take steps to prevent and treat injuries effectively. Remember to always listen to your body and seek medical attention if you experience any severe or persistent symptoms.
Immediate Response to Injury
If you have experienced a workout injury, it is crucial to respond appropriately to minimize the damage and speed up the recovery process. Here are some immediate steps you should take:
R.I.C.E. Method
The R.I.C.E. method stands for Rest, Ice, Compression, and Elevation. It is a well-known first-aid technique used to treat soft tissue injuries, such as sprains, strains, and bruises. Here’s how to use the R.I.C.E. method:
Rest: Avoid using the injured body part as much as possible. If necessary, use crutches or a brace to support the injured area.
Ice: Apply an ice pack to the injured area for 20 minutes at a time, several times a day. Ice helps reduce swelling and pain.
Compression: Wrap the injured area with an elastic bandage to reduce swelling and provide support.
Elevation: Keep the injured area above the heart level to reduce swelling. For example, if you have a leg injury, prop your leg up on a pillow.
When to Seek Medical Attention
While most workout injuries can be treated at home with the R.I.C.E. method, some injuries require medical attention. You should seek medical attention if:
The pain is severe and persistent.
You cannot put weight on the injured area.
The injured area is numb or tingling.
You have a visible deformity or an open wound.
The injury is accompanied by a fever.
In these cases, it is best to consult a doctor or a physical therapist for proper diagnosis and treatment.
Rehabilitation Strategies
If you’ve suffered a workout injury, rehabilitation is key to getting back to your previous level of fitness. Here are some rehabilitation strategies that can help you recover from your injury:
Physical Therapy
Physical therapy is a form of rehabilitation that focuses on restoring function, reducing pain, and preventing future injuries. A physical therapist will work with you to develop a personalized treatment plan that may include exercises, stretches, and manual therapy techniques to help you recover from your injury.
Strength Training
Strength training is an important part of the rehabilitation process. It can help you regain muscle strength and prevent future injuries. However, it’s important to start with light weights and gradually increase the intensity and duration of your workouts as you progress.
Mobility Exercises
Mobility exercises can help improve your range of motion and flexibility, which can be especially important after an injury. These exercises may include stretching, foam rolling, and other techniques designed to improve joint mobility.
Remember, rehabilitation takes time and patience. It’s important to work closely with your healthcare provider and follow their recommendations to ensure a safe and effective recovery.
Prevention and Best Practices
Proper Warm-Up Techniques
One of the best ways to prevent workout injuries is to properly warm up before exercising. This helps to increase blood flow to your muscles and prepares them for the physical activity ahead. A good warm-up routine should include dynamic stretching, light aerobic exercise, and mobility exercises. Dynamic stretching is a form of stretching that involves movement, such as lunges or leg swings. Light aerobic exercise could include jogging or jumping jacks. Mobility exercises focus on improving your range of motion and can include exercises such as leg swings or arm circles.
Cross-Training Benefits
Cross-training is another great way to prevent workout injuries. Cross-training involves participating in different types of physical activities to build strength and flexibility in different muscle groups. This can include activities such as swimming, cycling, or yoga. By cross-training, you can reduce the risk of overuse injuries and improve your overall fitness and health.
Nutrition and Recovery
Proper nutrition is also essential for preventing workout injuries and promoting recovery. It is important to eat a balanced diet that includes plenty of protein, carbohydrates, and healthy fats. Protein is important for muscle repair and recovery, while carbohydrates provide energy for your workouts. Healthy fats, such as those found in nuts and avocados, can help reduce inflammation in your body and promote healing. In addition to a balanced diet, it is important to stay hydrated by drinking plenty of water before, during, and after your workouts.
By following these best practices, you can reduce your risk of workout injuries and promote faster recovery. Remember to always listen to your body and seek medical attention if you experience any pain or discomfort during or after your workouts.
![Ultraboost 5X Running Shoe [review]!](https://ourfitnesszone.com/wp-content/uploads/2024/12/IMG_6329-1.jpg)